
I've been meaning to start actually writing about graphics programming (my day job) for a long time. This post isn't anything groundbreaking, but it's a really simple and quick technique that can be used to fake something akin to subsurface-scattering for toon and illustrative materials. I have meatier topics that I'm interested in covering, so consider this an amuse-bouche (though who knows when I'll get around to writing up that other stuff...)
Basic Toon/Illustrative Shading

The most basic way of doing toon shading is to define a step function such that given x = N • L, we have toon(x) = x > 0 ? 1 : 0. This will produce a hard edge anywhere the light transitions from being at a positive angle with respect to the surface normal to a negative angle.
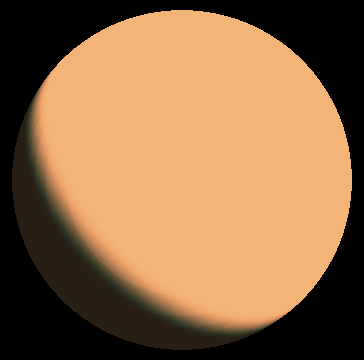
We can improve this drastically using the smoothstep function, which will do a smooth interpolation (with a cubic Hermite curve in GLSL and HLSL) between 0 and 1 given a min, max, and t value. Our function will now look like the following: smoothToon(x, spread) = smoothstep(0, spread, x) where 0 <= spread <= 1, and will produce results like the image on the left.
In GLSL:
float smoothToon(vec3 lightDirection, vec3 normal, float spread)
{
    float NdotL = dot(lightDirection, normal);
    return smoothstep(0.0, spread, NdotL);
}
A Simple Tweak for Skin-Like Rendering
Now that we've got our basic smooth toon shader, we can easily modify it to give us a result that bears a stylistic resemblance to how a material with subsurface scattering will look. This definitely doesn't approximate SSS or anything of that sort. We're already embracing extreme stylization by choosing toon shading, so the point is to give more artistic control over the final surface appearance and give the feeling of it (while also being very cheap).
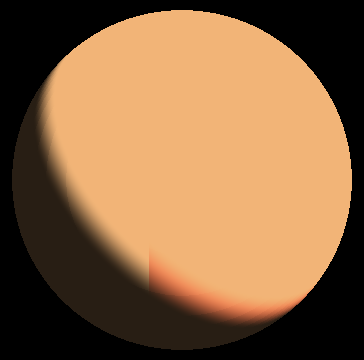
The modification to make here is that instead of having a single spread value, we have three: one per RGB channel. This allows us to control how far each channel should spread, which will influence how intense each color is in the smooth band. One thing to note is that the input spread values aren't the most intuitive: to get a more intense color in the band, we need to specify that the channel spreads less than the other channels. The spread values used to get the image here were vec3(0.2, 0.28, 0.29).
In GLSL:
vec3 smoothToonPerChannel(vec3 lightDirection, vec3 normal, vec3 spread)
{
    float NdotL = dot(lightDirection, normal);
    return smoothstep(vec3(0.0, 0.0, 0.0), spread, vec3(NdotL, NdotL, NdotL));
}
A final Tweak
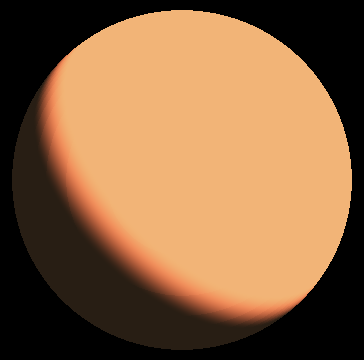
As a final note, if we were to center the smoothstep around the zero-angle transition instead of starting it at zero we'd get a band of the chosen color on the positive side, and a band of the opposite color on the negative side. The effect of that can be seen in the image here. This isn't particularly desirable for most illustrative skin styles, but it could be useful for different kinds of materials, so it seemed worthwhile to include it here.
In GLSL:
vec3 smoothToonPerChannel(vec3 lightDirection, vec3 normal, vec3 spread)
{
    float NdotL = dot(lightDirection, normal);
    return smoothstep(-spread * 0.5, spread * 0.5, vec3(NdotL, NdotL, NdotL));
}
There's an example shader up on Shadertoy for this.